On the Shoulders of Giants: My Take on the Kindle Weather Station
| Update: |
| I have started a new Github repo with my changes to the scripts used below. This has three purposes: 1) to keep a backup of the various jailbreak tools I used in case the forums go down; 2) improve the setup process from the many steps below to something a bit more automated; and 3) to push me to further customize the scripts and display to fit my desires. Eventually I would like to pull real weather readings from my house and plot those up on the display. |
I recently discovered how close the local recycling drop-off site is for the San Francisco bay when a family member gave us an old bum TV that I thought I could do something with. It turned out that it wasn't as great as I hoped, so it was up to me to get it to the dump. While dropping it off, I noticed a familiar shape in the nearly empty bin where I was dropping the TV: An old Kindle e-reader. It looked like the same generation as the Kindle DX I have in a box somewhere, and seemed to be in good condition, if not a bit dirty.
I decided to take a chance and bring it home. Worst case, it just ends up back in the same bin a couple weeks later. A quick plug in at home, and about 2 hours for it to come back to life, and I had a fully functional Kindle, books included. Now what to do with it? Well, a few years back, my good friend used his DX to build a weather station based on the work of Matt Petroff back in 2012. This is something I've wanted to do for a while but other projects got in the way. With a day to kill and nothing stopping me, I decided to go for it.
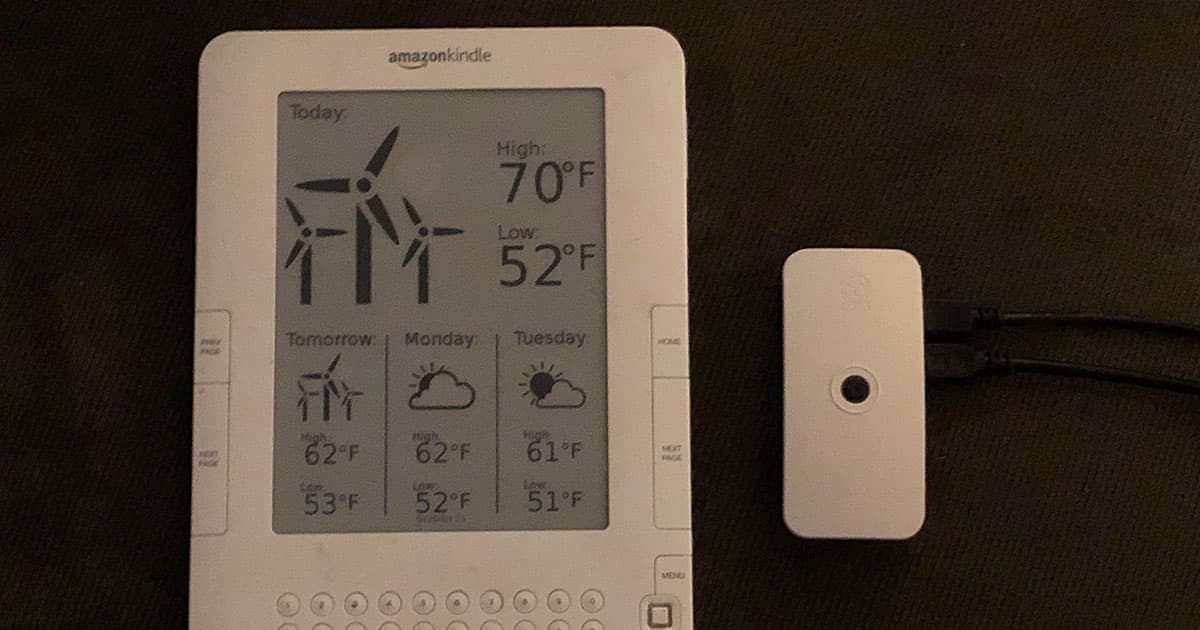
So, here is my take on the weather station. For now, the displayed image is nothing more than using another image generator from Jennifer Oslund at shatteredhaven.com. However, where I do differ is, I wanted to offer back to the community that I am benefiting from, a complete step-by-step instruction set for going from Kindle 2 to Raspberry Pi + Kindle weather display. I went into this with the intent of providing credit for everything I leveraged, including where I made modifications. If I missed something, let me know in the comments!
Alrighty, let's dig in!
| Note |
| The instructions below are specific to the Kindle 2 that I found. If you have a Kindle 3, 4, or any of the Paperwhite models, please read into the linked forum threads for more info on what to do for that hardware. Generally, the community has been super-duper helpful in providing all the info needed, and for the Paperwhite models, it's even easier than listed her. Again, check the forums for full details. |
The Jailbreak Itself
Note: We can't use Kite on Kindle 2, as it doesn't seem to be supported.
- Check out the jailbreak forum and Download kindle-jailbreak-0.13.N.zip
- Follow these instructions, TL;DR:
- Unzip, plug in the kindle, wait for the drive to mount
- Drag "Update_jailbreak_0.13.N_k2_install.bin" into the root of the Kindle drive, eject
- On you Kindle, go to Settings, press Menu and select Update Your Kindle
- Wait for it to finish. Note: On Kindle 2, it is expected for it to "fail" with error "U006"
- Install MKK (Mobileread Kindle Kit) as a prerequisite for KUAL
- Go to the forum and download kindle-mkk-20141129.zip
- Installation is as normal: Mount, drag installer, unmount, update, reboot
- Install KUAL (Kindle Unified Application Launcher)
- Go to the forum and download KUAL-v2.7.zip
- First, unpack the KUAL-v2.7.zip from above. Then, use the KUAL-KDK-1.0.azw2 file
- Install by putting the appropriate azw2 file somewhere in the documents/ directory tree of your device
- Install USB Networking
- Download kindle-usbnetwork-0.57.N-k2.zip from the same jailbreak forum above
- Install as normal (mount, drag, unmount, update, reboot)
SSH Networking
Kindle side
- Launch KUAL by selecting it like a normal e-book from the Kindle's main UI
- Unplug USB cable from the Kindle (disconnecting from laptop-side won't work)
- Navigate to USB Networking: enable networking, enable SSH at boot
- Quit KUAL, plug the USB back in and it should not mount the USB drive -- USB networking is up
Computer side
To test the networking is up, let's first check from our main computer. I will breeze over this, since it depends on your OS. Here are the settings to change for the "USB Gadget" device. We will get into the specifics of setting this up on the Raspberry Pi itself in a bit. If you're on Linux, those might work for you here as well.
- Set up a manual network on the USB interface
- IP:
192.168.2.1 - Mask:
255.255.255.0
- IP:
- SSH to
ssh root@192.168.2.2 - Password:
mario(for Kindle 4 or later, Kindle Password Tool)
Fix Clock / Time Zone
Unfortunately, on this Kindle, the timezone was messed up. Since the Kindle isn't registered to me, I don't seem to have the manual time settings option, and I didn't want to turn on WisperNet lest it mess up my config, or worse, mess up something for the original owner's account, I had to figure out how to set the time and timezone manually. After some digging (sorry, I lost the link for where this came from), I found a preference file that seemed to do the trick.
- SSH into the Kindle and run
vi /var/local/java/prefs/com.amazon.ebook.framework/prefs - Edit the settings here to match your desired TZ offset, name, etc
- For me, I used
America/Los_Angeleswith a seconds offset of-25200
- For me, I used
- Set the date with
date MMDDhhmmYYYY.ss, e.g.date 051119382018.00, which will set the time to19:38:00 May 11th, 2018 - Save to the hardware clock with
hwclock -w
Running date by itself still shows the incorrect timezone, however when viewing the clock on the
Kindle itself (press the "Settings" key to see it in the top status bar) shows the correct time.
Raspberry Pi Setup
My goal for this build is to have both the Kindle and a Raspberry Pi mounted on the inside of my main door with just a power cable snaked in. That way I'll have an at-a-glance view of the weather and since it's a Raspberry Pi Zero W with the Pi NoIR camera, I can play around with maybe some facial recognition for comings and goings, or whatever strikes my fancy in the future.
Oh yeah, and be sure to plug the Kindle into the Raspberry Pi at this point, as I'll be assuming that from here foreward 😋
(( WiFi )) <~~> [ Raspberry Pi ] <-USB-> [ Kindle ]
Links
Instructions
- From the Raspberry Pi (SSH or direct, whatever you like)
- Append the USB networking config to the end of the file, it will auto start
$ sudo vim /etc/network/interfaces allow-hotplug usb0 mapping hotplug script grep map usb0 iface usb0 inet static address 192.168.2.1 netmask 255.255.255.0 broadcast 192.168.2.255 up iptables -I INPUT 1 -s 192.168.2.1 -j ACCEPT - Test logging in with via SSH from the Raspberry Pi to the Kindle
- Install NginX
sudo apt-get install nginx - And start
sudo /etc/init.d/nginx start
Weather Station
Ah, the meat of this build, and the reason I started into this in the first place. Like I mentioned above, this whole thing is possible because of the great people before me who were gracious enough to share their knowledge. Below are the main posts that helped me push forward and gave me the jumping-off points for most of the forums, or the right terms to use to successfully search for the rest. Huge gratitude to everyone who made this a one-day project instead of weeks or more.
Standing on the Shoulders of Giants:
- The O.G. Matt Petroff's Instructions
- Jennifer's Instructions
- Galactic Studios' Instructions
- Great RF temperature / RasPi / Kindle setup from Robert Moore's Instructions
- The fine Mr. Jón's Repo who originally inspired me years ago
Instructions:
- From the Raspberry Pi
$ wget http://www.galacticstudios.org/wp-content/uploads/2015/10/KindleWeatherDisplay.zip $ sudo mv /var/www/html $ cd /var/www/html - SSH into the Kindle from the Raspberry Pi
- Pull down the important bits
$ wget http://192.168.2.1/KindleWeatherDisplay.zip $ mv KindleWeatherDisplay.zip /mnt/us/ $ cd /mnt/us $ unzip KindleWeatherDisplay.zip $ echo "http://192.168.2.1/weather.png" > weatherurl $ chmod +x kite/* - Modify
Add_Weather_cron_JobandRemove_Weather_cron_Jobto change the last line from2>>&1to2>&1, since the Kindle doesn't like it and, while you're at it, change thecrontime from every 30 minutes to every 10 minutes (e.g.*/30becomes*/10) -- for more info oncronlines and how it works, check out this quick tutorial for Raspbian - Finish the setup and install the setup
$ cd kite
$ ./Add_Weather_cron_Job
$ cd ..
$ chmod +x Display_Weather
$ exit
- Pull down the important bits
- From the Pi
- Pull down the important bits
$ wget https://github.com/shatteredhaven/KindleWeatherDisplay/archive/master.zip $ unzip master.zip - Change the last line of
/home/pi/KindleWeatherDisplay-master/Modified\ Files/Raspberry\ Pi/weather-script.shtosudo cp -f weather-script-output.png /var/www/html/weather.pngto conform to our paths - Change
/home/pi/KindleWeatherDisplay-master/Modified\ Files/Raspberry\ Pi/weather-script.py, where it saysweather_xml = urllib2.urlopen...to use your own coordinates instead of the default ones of the original author - Update and get
cronsetup$ crontab -e */5 * * * * /home/pi/KindleWeatherDisplay-master/Modified\ Files/Raspberry\ Pi/weather-script.sh $ sudo /etc/init.d/cron restart
- Pull down the important bits
- Rejoice! (but also, wait about 30 minutes to see if the image updates)
Appendix: Useful Information
- Useful Commands via SSH from the Kindle 4 jailbreak wiki